Hand-rolling Japanese sencha tea
It’s 7:30 a.m. and I’ve already been awake for two hours. In my dew-drenched hands there’s a woven basket. I walk between waist-high rows of verdant bushes, streaks of water along your thighs as you reach across the row, wet tea leaves tickling my wrist as I scan for the perfect pluck: two leaves, one bud.
Pinching the base of the supple stem between the soft pad of my thumb and forefinger, I snap it off, and toss it into your basket. One of hundreds needed. Welcome to your first step in hand-making Japanese tea.
Nowadays, you won’t see much tea in Japan rolled by hand. More than 99% of Japanese tea is made using factory machines. You can explore the process of creating Japanese tea nowadays by reading my guide to what happens inside a Japanese tea factory.
Machines are used because making tea by hand is very time-consuming.
A machine driven by one person can harvest roughly 40 times the amount of tea that could be harvested by the same person by hand.
Plucking tea by hand takes a long time, but ensures a high-quality final product.
Rolling tea by hand (temomi, pronounced tay-mo-me) was the best way to craft Japanese sencha green tea prior to the 1896 advent of Japanese tea machinery. Before hand-rolling, the tea in Japan was often uneven and irregular in its appearance. Temomi was created in 1783 by Souen Nagatani. He was a Japanese tea farmer and merchant whose claim to fame is raising the prestige and quality of Japanese tea. When reading about him I was reminded of Thomas Lipton who conquered the Sri Lankan tea export market in the 1890s and early 1900s by creating a standard and shipping process that delivered a reliable product. There's something to be said for being predictable in business.
Nagatani created sencha (now the most popular kind of tea grown and consumed in Japan) by formulating a recipe for processing tea,which he called his ‘blue sencha recipe’ (青製煎茶製法). This ‘recipe’ is basically the same process all sencha tea is made with today and is the basis for the prescribed method we’re going to use to roll Japanese tea by hand.
Rolling tea by hand creates beautiful and tasty Japanese green tea by combining heat, pressure, and time to the leaves in a specific order.
What you have to understand about Japanese tea before the advent of hand-rolling is that there was no quality or consistency. Sometimes the leaves were brown, sometimes green, sometimes curled, sometimes not. Nagatani’s ‘recipe’ allowed for a high-quality, regular sweet, refined flavour of green tea. created the profile of a thin, needle-shaped leaf that high-quality Japanese tea is known for today.
Nowadays, hand-rolling is kept alive by being passed down through family businesses, and through groups such as the Tea Hand Rolling Preservation Associations in tea-growing villages such as Wazuka, that hold yearly community events.
Each time, it takes a whole day of picking, steaming, rolling, shaping and drying the leaf. You wake early in the morning and by suppertime, if you’re lucky, you have some lovely, fresh tea ready to drink.The community usually makes a day of it, with lunch, snacks, and all that.
I was really lucky and got to create tea a few times by hand during my time living in Wazuka. It’s a town known for being a ‘tea village’ in the Kyoto region.

A beautiful day for tea harvesting up at Obubu’s Heavenly Tea Field.
Here’s the art of hand-rolling traditional Japanese green tea in ten steps:
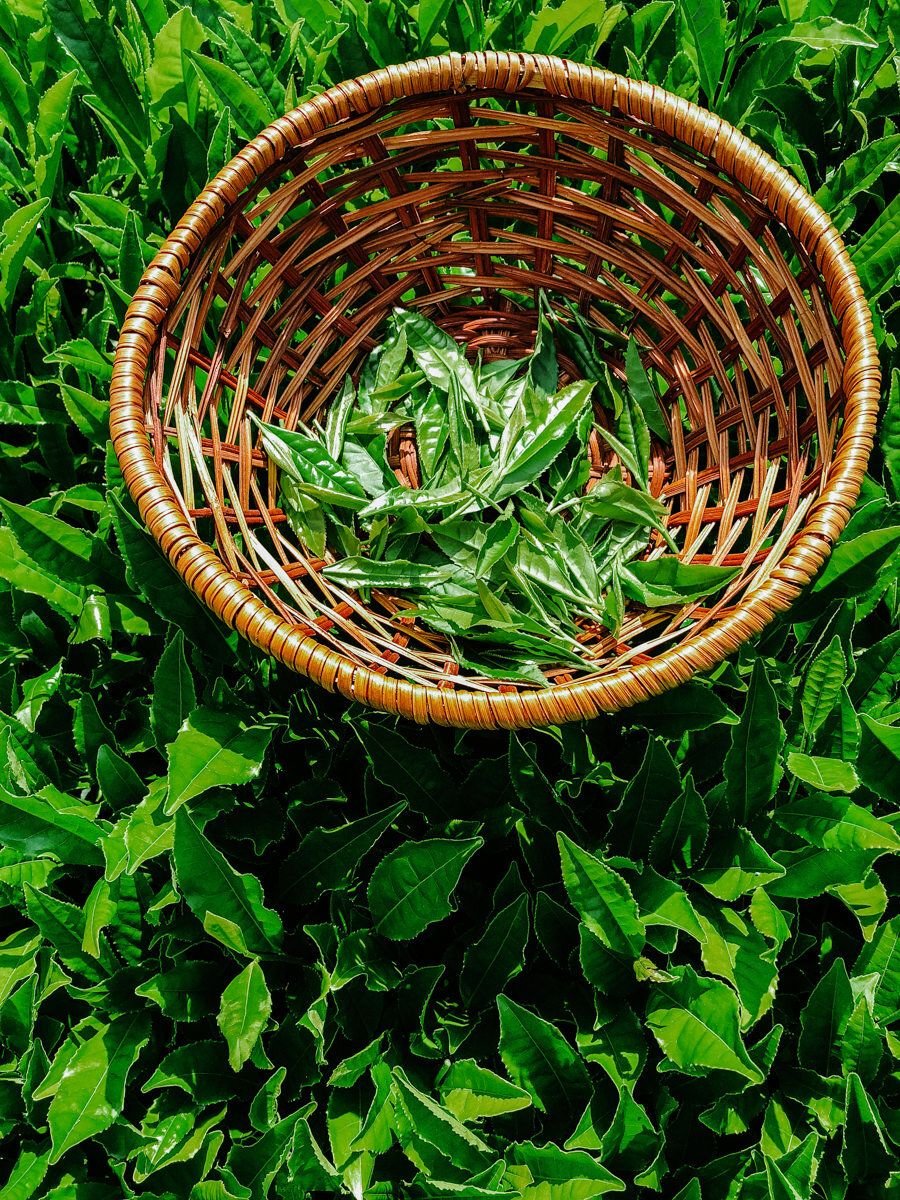
STEP 1: HAND-PICKING
The first thing you need todo is go out into the tea fields early in the morning. You might wake up at 5a.m. or so in the summer to get out while the buds are still slightly chilled and covered in dew. The tea field you’re visiting might also be high up in the mountain fields, not down in the village, which will add some time to your commute.
“Pluck 10 pounds of tea, and in the end, you’ll only be left with 2.5 pounds of finished tea.”
When you pick tea, the perfect pluck consists of one bud and two leaves.
When you’re harvesting tea of this quality, it’s best to pluck the leaves by hand, not use the traditional machine cutters.
You’ll need to harvest a decent amount of fresh leaf to walk away with a bag of tea at the end. Whatever you pick will be reduced to about a quarter of its original weight. Pluck 10 pounds of tea, and in the end, you’ll only be left with 2.5 pounds of finished tea.
Time: ~1-2 hours
STEP 2: STEAMING (蒸熱)
We steam the fresh leaves as soon as possible to stop oxidation. Just like when you cut into an apple, oxidation will turn the tea leaves brown, and eventually black (in fact, this is how you make oolong and black teas). So, in order to keep the leaves green and preserve the desired, traditional Japanese green tea characteristics, we steam the leaves.
Bamboo baskets filled with tea leaves are lifted one at a time onto the gas-heated stainless steel drum filled with boiling water that forces steam up into the baskets. Kind of like making dumplings. The leaves are flash-steamed, and then moved onto the next step.
This step takes less than a minute but it’s especially important to Japanese green tea. In small batches, the leaves are steaming for about 20 seconds while being quickly stirred with chopsticks.
Once the steaming is complete, the leaves are carried over to the hoiro (焙炉), a drying table unique to Japanese tea. The surface of the table is heated. Traditionally, charcoal is used, but ours was more modern and used gas.
The surface of the table is made of thick paper and stained with persimmon juice, which when combined with generations of leaves rolled on top of the table, turns the paper a light rusty orange.
At the beginning of this stage, the table is quite hot. Touching it feels like putting your hand on the hood of a car that’s been out on the sun on a summer day. Later, the heat is reduced during the final stages.
Time: ~20 minutes
STEP 3: SHUFFLING THE LEAVES (葉ぶるい)
In handfuls you pick up the damp tea leaves and shuffle them lightly between your fingers, raining them down across the heated paper surface of the table. Here you’re removing the water after steaming and helping the surface of the leaf to dry so they’re easier to roll. The leaves at this point are almost sticky from the heat and water.
You shake and drop the leaves onto the top of the table over and over again for about an hour or so until most of the water is shaken or evaporated off.
Time: ~60 minutes
STEP 4: ROLLING
The actual rolling of the leaves has many steps, and each school of rolling across japan has a slightly different technique, but generally speaking, you’ll begin with a light rolling called maguri, in which the leaves are first rolled lightly by hand from side to side to gently press the moisture out of the leaves.
Then, you’ll progress to kaitenmomi, which translates to something like ‘spin-rolling,’ where you’ll start rolling the leaves into more of a ball shape and rolling harder than in the previous step. This helps squeeze water out from inside the leaf, and breaks down the cell walls, releasing the leaves’ sugars and resulting in a sweeter-tasting final product.
At this point, most rollers really get into a rhythm, sort of jiving from side to side in a dance. Rollers are often paired two or more to a table, so when everyone starts moving from side to side with a little bounce in their knees, it’s really something. It's also hell on your back.
Eventually, the leaves will be all tangled up into clumpy leaf balls.
Time: 60+ minutes
STEP 5: BREAKING UP THE BALLS
After all the spinning, you’ll want to de-clump your tea leaves and spread them out thinly all over the table again. This is done by rolling them slowly apart and gently shaking the mover the table so they can cool again. Just like detangling a fishing net, some need to be done slowly, by hand. If possible, we’re still trying to preserve the long leaves, so this stage is surprisingly gentle.
This doesn’t take too long, may 10-20 minutes depending on how much tea you have.
Meanwhile, the paper surface of the table is often cleaned at this step of any leaf juice and debris to prepare for the next step.
Time: ~20 minutes
STEP 6: STRAIGHTENING (揉み切り)
Have you ever made a play-do worm? Where you pick up the clay and shuffle your hands together until you get a satisfying, straight line? This is essentially that. You’re picking up handfuls of leaves and worming them between your hands as they drop between your palms and on to the table.
Time: ~30 minutes
STEP 7: PRESSING (でんぐり揉み)
Now we leave the tea on top of the table andstart to roll the leaves against each other. From the reduced water andfriction, the leaves here start to become a shiny, dark green. They also startto smell really nice here.
Time: ~40 minutes
STEP 8: ROLLING ON A BOARD (板ずり)
At this stage we’re putting the final touches on our pin-straight leaves, achieving that familiar sencha shape. We’re trying here to make them all uniform (because, Japan) and this is also the hardest rolling stage because you need someone who really knows what they’re doing in order to get the right shape.
You’re sort of rolling the leaves by moving them all together in a shape about the size of a small loaf of bread, and you’re rotating them against each other while sort of clasping them in your hands. You keep halving the leaves and mixing them int with each other so all the leaves get rotated spending time on the inside and outside of the pile. This final step has a few different names depending on the region. Here, we use itazurishiage. Other places have techniques that vary, called momikirishiage and kokurishiage. All three can be classified as shiagemomi, which means ‘final rolling.’
Time: ~40 minutes
STEP 9: DRYING (乾燥)
You’ve finally got your beautiful leaves! You now spread out all the leaves (which are pretty dry by this point across the table, which is heated to about 70 °C (158 °F). Using your fingers, clear a small circle every 12 inches or so in the piles of leaves by skimming a circle across the table surface and then tapping it. This hole is made to help the heat disperse. After they dry here for a while, they’re loaded into trays and taken to another oven.
These tea-drying ovens look almost like industrial beehives. Or imagine a tall office filing cabinet if it was an oven. Trays full of tea slot in and then have their final heating in here. When you push on a leaf and it’s brittle, you know you’re done.
Time: ~30 minutes
STEP 10: FINISH! (仕上がり)

An unprocessed leaf laid against the tiny, finished tea needles for size.
Congratulations, you’ve made tea! This aracha, or ‘raw tea’ can now be drunk, or taken to Kyoto to be sold at auction, or blended with other sencha to create different flavour profiles.